Modifying the Sony ST-SB920 Tuner
from my own Personal Experience
Please be aware that mains voltages are present. Do not remove cover until unit is un-plugged from the Mains Electricity Supply. Do not plug in again until the cover is replaced.
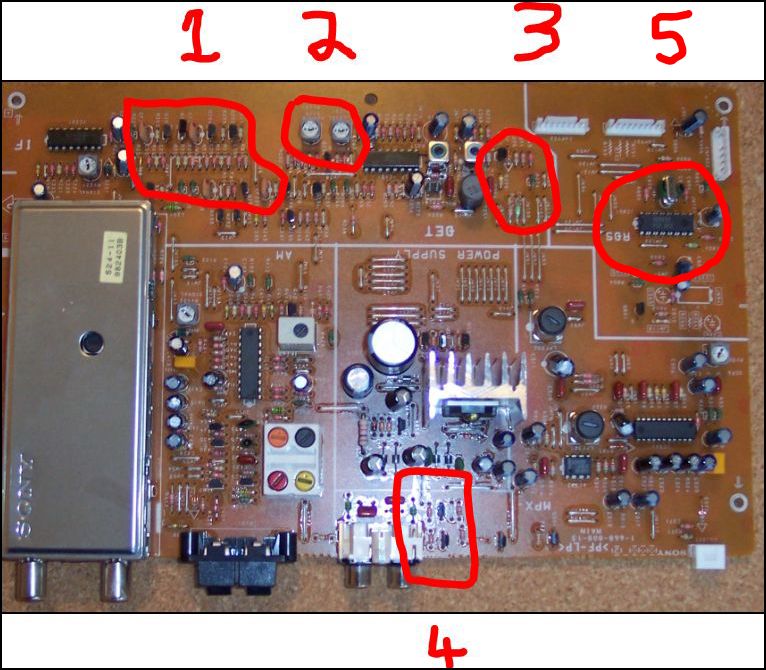
Main Chassis removed from the tuner showing points of interest:

| 1 | Location of I.F. Filters |
| 2 | RF and Stereo Gain Controls |
| 3 | Location of Audio for Conrad RDS Manager |
| 4 | Squelch Links |
| 5 | RDS Chip |
AUDIO FEED TO CONRAD RDS MANAGER
Firstly to connect the tuner to the Conrad RDS Manager. This can be done with out having to remove the chassis. So if you do not intend to replace the filters it is a quick and easy job.
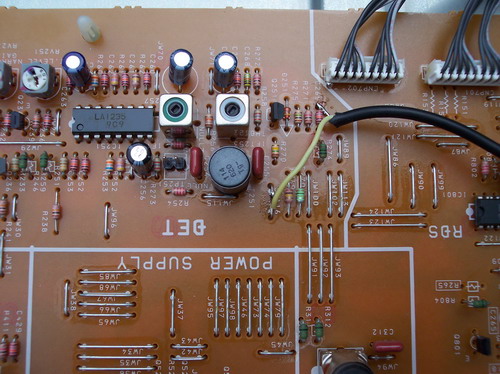
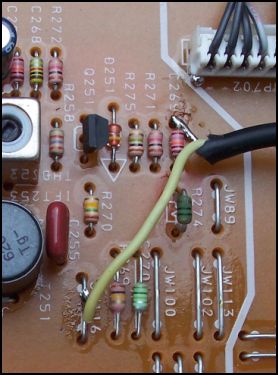
Connections are at JW116 and the end of C269 by the connector, (which is the nearest Earth Point).
SQUELCH MOD
The second modification can also be carried out without removing the chassis. This is to disable the squelch or muting. Two links require cutting, they are JW 75 and JW 72. Location of the links can be seen from the picture below:

RF GAIN & STEREO SENSIVITY
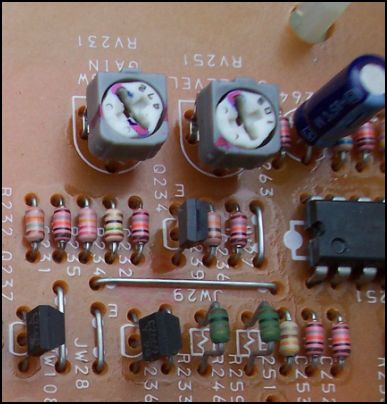
The Gain control, RV231, seems to be factory set to just past half way. As this tuner has a very sensitive front end module I assume this is why Sony ship them out like this. Fine for domestic use but not DX use.
I experimented with a indoor horizontal piece of wire as an aerial with the tuner on 102.20MHz. This is Galaxy FM a vertically polarised station located 44KM, (27 Miles), from my QTH. With the gain control at default setting I received no RDS at all or a PI reading on the Conrad. By adjusting the Gain Control a few millimetres the RDS came in on the tuner straight away and of course the Conrad displayed the PI Code.
I have found that the gain is best adjusted just short of full. I noticed that in the full position quite a lot of noise is introduced on weak signals. The stereo control, RV251, can again be adjusted just short of full.
I.F. Filters
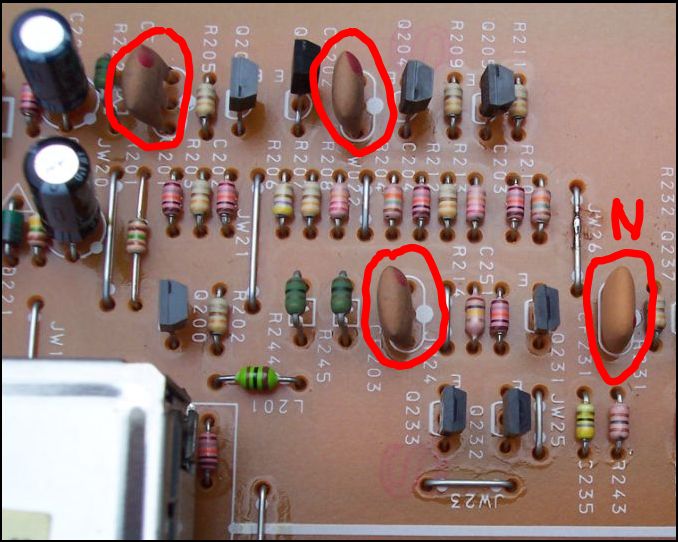
The tuner has four filters fitted, three 230kHz and one 150kHz in the narrow position (CF231).
To retain the important RDS facility for the PI codes and improve the selectivity I have fitted four 150KHz low loss filters in my one receiver. In my other receiver I have fitted three 150KHz and one 110KHz.
I leave my receiver in the narrow mode all the time and luckily the memories retain this information. Below is a picture showing the location of the filters:
DIRECT FEED TO PC FROM RDS CHIP
Finally if you do not own a Conrad RDS Manager then it is possible to wire the tuner directly to the Com Port of the PC. The Earth can be connected to JW99 and the two pins circled provide Clock and Data outputs to the PC COM Port.
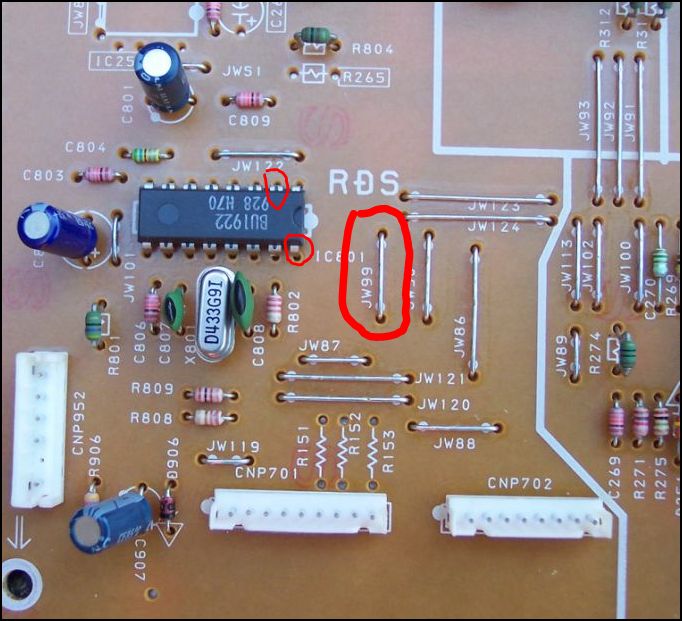
The RDS I.C. used is a BU1922. Pin 2 is the Data connection, Pin 16 is the Clock connection and Pin 9 is Earth connection but I found it easier to use JW99 as the Earth.
If you are using the DOS RDSS Program and your PC has a 9 Pin Com Port then Pin 8 is the Clock connection, Pin 6 is the Data connection and Pin 5 is the Earth connection.
If your PC has a 25 pin Com Port then Pin 5 is the Clock, Pin 6 is the Data and Pin 7 is Earth.
Do not Hot plug and un-plug the com port plug.
This is also the feed for RDS SPY for both Audio and Serial interface. See the RDS SPY manual for details which can be downloaded with the program from here.
| RDS Chip Pin | 9 Way PC Plug | 25 Way PC Plug |
| 2 {Data} | 6 | 6 |
| 9 {Earth} | 5 | 7 |
| 16 {Clock} | 8 | 5 |
|
RDS SPY Sound Card wiring |
 |
If you are going to use the Windows RDSDX Program then read the supplied manual as a transistor interface needs to be added to the tuner for best results.